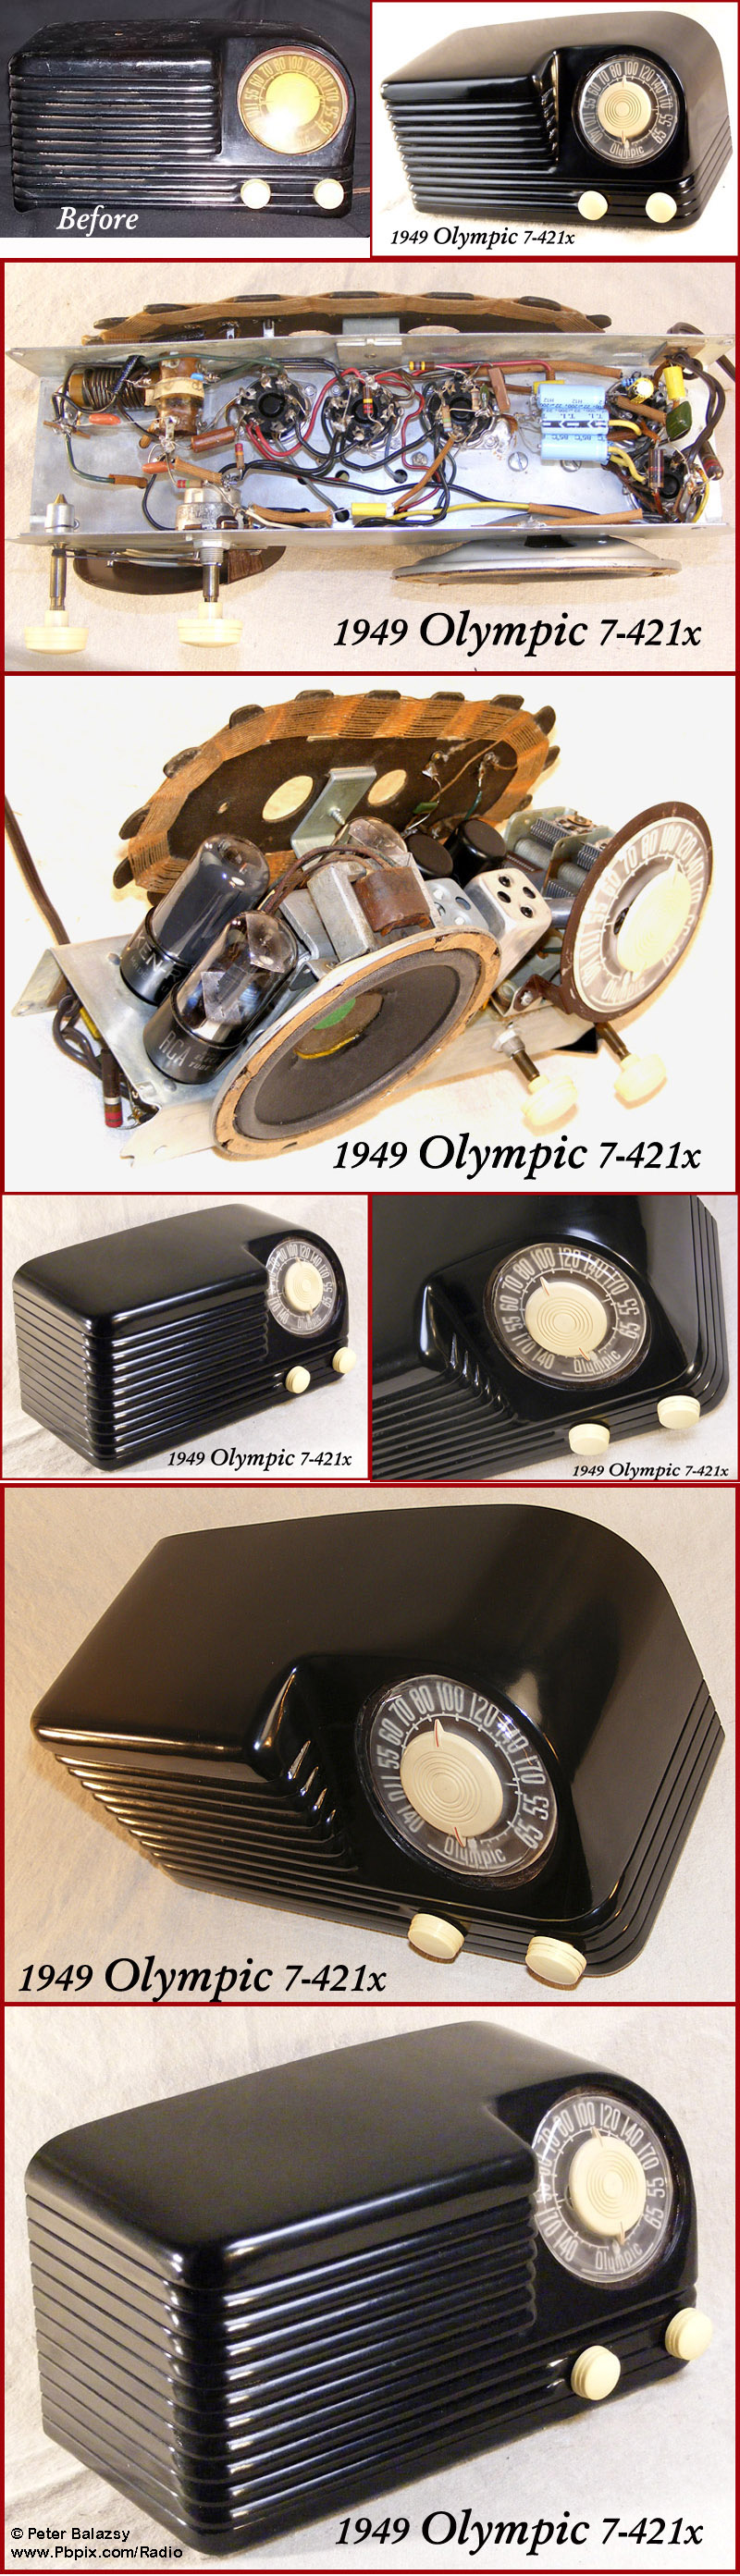
I bought this on Ebay for thirty bucks, I think, a few months back expecting it would be an easy one for my painter-friend Ken to repaint for me.
However he's been occupied with more profitable endeavors lately so I decided to try to bring it back au-natural so to speak.
I was very pleased to find the Bakelite to be in such good shape as far as no cracks or scratches go.
I re-capped it and realigned it then gave this dirty, nasty old chassis the old kitchen sink "scrubba dubba doo" clean-up job and let it dry.
I'm very pleased that it really came out so screamingly gleaming nice.. lol.
The real rub was the speaker. It wasn't torn or anything but it seemed a bit stiff and harsh-sounding to me.
My first step was to try to improve the tone by adding an 18k resistor in series with a .01uf cap from the 12SQ7 plate to ground.
This really helped to add some nice soft-sided bass.
I usually do this by initially putting the cap in series with a 500k pot and adjusting it til it seems to sound just 'nice'. Then I measure the pot value and use that size resistor to solder in.
But the final deep rich tones were achieved only after partially replacing the old cone with one of those nice 49 cent replacements.
This radio now has a wonderful rich deep throaty-ness that seems to belie its size.
As for the cabinet, I spent some elbow-grease time washing and scrubbing the Bakelite too in the sink and lots of time rubbing it out with rubbing compound and finally a little light coat of wax.
Then the next headache was that yellowed old dial lens. So I used the opening and drew the template on some 3/8" Masonite.
Then cut it out with my scroll saw and after filing it smooth on the sides I put a piece of polycarbonate plastic over the center template and stuck it in my toaster oven for a couple minutes till the plastic drooped down around the sides. Then I took it out and quickly slipped the outer collar down over it to sharpen the edges.
I cut the edges to fit inside around the opening nicely and glued it in place with Sobo brand fabric and craft glue.
:
:I bought this on Ebay for thirty bucks, I think, a few months back expecting it would be an easy one for my painter-friend Ken to repaint for me.
:
:However he's been occupied with more profitable endeavors lately so I decided to try to bring it back au-natural so to speak.
:
:I was very pleased to find the Bakelite to be in such good shape as far as no cracks or scratches go.
:
:I re-capped it and realigned it then gave this dirty, nasty old chassis the old kitchen sink "scrubba dubba doo" clean-up job and let it dry.
:
:I'm very pleased that it really came out so screamingly gleaming nice.. lol.
:
:The real rub was the speaker. It wasn't torn or anything but it seemed a bit stiff and harsh-sounding to me.
:
:My first step was to try to improve the tone by adding an 18k resistor in series with a .01uf cap from the 12SQ7 plate to ground.
:
:This really helped to add some nice soft-sided bass.
:
:I usually do this by initially putting the cap in series with a 500k pot and adjusting it til it seems to sound just 'nice'. Then I measure the pot value and use that size resistor to solder in.
:
:But the final deep rich tones were achieved only after partially replacing the old cone with one of those nice 49 cent replacements.
:
:This radio now has a wonderful rich deep throaty-ness that seems to belie its size.
:
:As for the cabinet, I spent some elbow-grease time washing and scrubbing the Bakelite too in the sink and lots of time rubbing it out with rubbing compound and finally a little light coat of wax.
:
:Then the next headache was that yellowed old dial lens. So I used the opening and drew the template on some 3/8" Masonite.
:Then cut it out with my scroll saw and after filing it smooth on the sides I put a piece of polycarbonate plastic over the center template and stuck it in my toaster oven for a couple minutes till the plastic drooped down around the sides. Then I took it out and quickly slipped the outer collar down over it to sharpen the edges.
:
:I cut the edges to fit inside around the opening nicely and glued it in place with Sobo brand fabric and craft glue.
:
:
:Hi! Peter,
Nice save. Too bad the peanut gallery came back. The more I look at the radio the more it grows on me. It looks a little plain all by itself but in the right surrounding it would really stand out.
Bob Masse
:
:
:
:
Well .. whatever it was.. it must have come and gone while I was snoozing... lol
At any rate, what I said was that it took me a while to figure out how you made the plastic bezel, 'cause at first I thought that you were forming it into a circular hole, but then realized that you were using a circular disc as a form. It looks great! I probably would have never bought the radio as it looked when you got it, but you certainly turned it into a gleaming gem. Does the dial light up? It's very modern!
T.
:
:At any rate, what I said was that it took me a while to figure out how you made the plastic bezel, 'cause at first I thought that you were forming it into a circular hole, but then realized that you were using a circular disc as a form. It looks great! I probably would have never bought the radio as it looked when you got it, but you certainly turned it into a gleaming gem. Does the dial light up? It's very modern!
:
:T.
:
Yes the dial lights up beautifully... not completely all the way around but most of it.
As far as the dial lens.. I've made about 20 of them now.
The toaster oven makes it the best. I used to use the regular oven but it took to long to get hot enough.
The toaster oven works in a couple minutes.
I bought my like-new Craftsman scroll saw just for this purpose.
Used on Ebay it was a great deal for about $80 I think.
.. not "to long"... lol