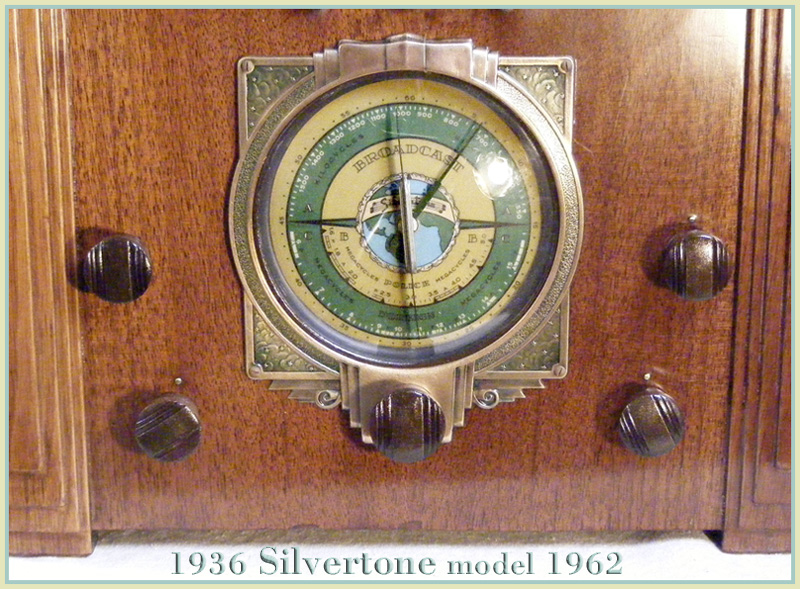
Okay guys here it is. I just finally got this Silvertone model 1962 all back together.
I had to re-do one small area of the right side of the cabinet however... and with one problem leading to another it took about a week...lol.
But the final finish as you see it here now is about 8 coats of hand-rubbed lacquer with Butcher's wax as a protective coat.
It sounds much better now to... because... of course, like most well designed cabinets the sound is greatly improved when the chassis and speaker are mounted in the cabinet.
As far as the grille cloth goes I repainted the old one with a light spray coating of metallic-gold paint with a light spritzing of silver too.

:Okay guys here it is. I just finally got this Silvertone model 1962 all back together.
:
:I had to re-do one small area of the right side of the cabinet however... and with one problem leading to another it took about a week...lol.
:
:But the final finish as you see it here now is about 8 coats of hand-rubbed lacquer with Butcher's wax as a protective coat.
:
:It sounds much better now to... because... of course, like most well designed cabinets the sound is greatly improved when the chassis and speaker are mounted in the cabinet.
:
:As far as the grille cloth goes I repainted the old one with a light spray coating of metallic-gold paint with a light spritzing of silver too.
:
:
Beautiful job Peter!
:
Thanks...
Butcher's wax is a wood wax for butcher blocks and bowling alleys etc:
http://www.bwccompany.com/bostonpolish.html
:
:
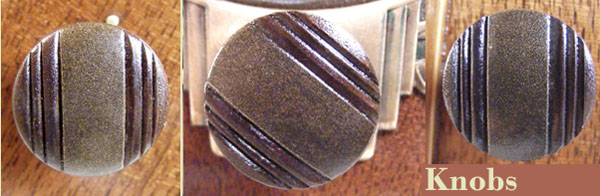
The knobs looked worse on camera.
There seems to have been a sort-of bronze or copper-like colored center stripe on all the knobs that has mostly worn away.. and that makes them look worse now with the worn-off areas showing.
I decided to try to replicate that bronze stripe with a touch of gold and and a spritzing of walnut toner lacquer over it. Then clear lacquer over everything.
When dry I'll re-post images.
Thanks for bringing it to my attention...
Why I didn't really notice it is beyond me.
Here's a picture of the re-finished knobs.
Thanks for pointing it out.
:Okay guys here it is. I just finally got this Silvertone model 1962 all back together.
:
:I had to re-do one small area of the right side of the cabinet however... and with one problem leading to another it took about a week...lol.
:
:But the final finish as you see it here now is about 8 coats of hand-rubbed lacquer with Butcher's wax as a protective coat.
:
:It sounds much better now to... because... of course, like most well designed cabinets the sound is greatly improved when the chassis and speaker are mounted in the cabinet.
:
:As far as the grille cloth goes I repainted the old one with a light spray coating of metallic-gold paint with a light spritzing of silver too.
:
:
:
:
:Hi! Peter
It looks nice! Did you strip it down or just clean it up and recoat it? On another note, maybe you should put ,(another Ebay show & tell by Peter Balazsy)in the heading, beating G. Berg to the punch and taking away his fun. There might even be some humour in that and it is going to wind up in the thread anyway. I look forward to seeing more pics.
: Tks. Bob Masse
::Okay guys here it is. I just finally got this Silvertone model 1962 all back together.
::
::I had to re-do one small area of the right side of the cabinet however... and with one problem leading to another it took about a week...lol.
::
::But the final finish as you see it here now is about 8 coats of hand-rubbed lacquer with Butcher's wax as a protective coat.
::
::It sounds much better now to... because... of course, like most well designed cabinets the sound is greatly improved when the chassis and speaker are mounted in the cabinet.
::
::As far as the grille cloth goes I repainted the old one with a light spray coating of metallic-gold paint with a light spritzing of silver too.
::
::
::
::
::Hi! Peter
: It looks nice! Did you strip it down or just clean it up and recoat it? On another note, maybe you should put ,(another Ebay show & tell by Peter Balazsy)in the heading, beating G. Berg to the punch and taking away his fun. There might even be some humour in that and it is going to wind up in the thread anyway. I look forward to seeing more pics.
:: Tks. Bob Masse
Peter,
Great idea painting the grill cloth! I am finishing up a Zenith console with similar cloth that I think I can salvage.I never would of thought to use spray paint. Keep it up.
Jon.
:
:Great idea painting the grill cloth! I am finishing up a Zenith console with similar cloth that I think I can salvage.I never would of thought to use spray paint. Keep it up.
:Jon.
Thanks. Yes.. sometimes it's very hard to find a nice complementing cloth so this is a good alternative.
: It looks nice! Did you strip it down or just clean it up and recoat it? On another note, maybe you should put ,(another Ebay show & tell by Peter Balazsy)in the heading, beating G. Berg to the punch and taking away his fun. There might even be some humour in that and it is going to wind up in the thread anyway. I look forward to seeing more pics.
:: Tks. Bob Masse
:
Yes it was stripped and the top veneer was replaced too:
You can read the whole step by step process over at ARF here in this thread:
http://antiqueradios.com/forums/viewtopic.php?t=116645
I have been afraid to use it fearing that it may not be a long term solution.
Thanks.
Ed.
:
:I have been afraid to use it fearing that it may not be a long term solution.
:
:Thanks.
::Ed.
I haven't been able to determine it as I only started doing it a few years ago. I know that with NOTHING it started rusting right away after cleaning away old rust.. so I had little to loose.
But I got the idea from the fact that all brass furniture is lacquered to keep it from tarnishing.
If you want REAL security try Permalac... they say it works in any weather too... needs refreshing coats about every ten years.
http://www.permalac.com/
::How effective do you find the clear lacquer to be in preventing further rusting of the chassis?
::
::I have been afraid to use it fearing that it may not be a long term solution.
::
::Thanks.
:::Ed.
:
:Hi Ed:
:I haven't been able to determine it as I only started doing it a few years ago. I know that with NOTHING it started rusting right away after cleaning away old rust.. so I had little to loose.
:
:But I got the idea from the fact that all brass furniture is lacquered to keep it from tarnishing.
:
:If you want REAL security try Permalac... they say it works in any weather too... needs refreshing coats about every ten years.
:http://www.permalac.com/
:
:
:

Sirs . . . .
Ohhhh . . . . . this is very distressing and disturbing to me, as I am just looking at some of my custom instrumentaton and test equipmemt that I built back in '68 thru the 70's.
When I clean off a micro layer of dust . . . .Woe is me . . . . I am not seeing any, checking, alligatoring, or flaking off, being as pristine as the day that I put it on.
The product . . . .Krylon Crystal Clear . . .Acrylic Lacquer . .or is that lakker or lacqure ?
Lets see now 10, 20, 30 , 40 + 1, that would be 41 years.
Plus after also having confirmed you having heated the chassis during cleanup, that was the other aspect in humid times, to apply the Lacquer to that cooled down / degreased /pasteurized / homogenized / sterilized chassis in its only so slightly warm state.
Baaaaaack to the KNOBS, Sir Peter, still the little boo-boos of scraped off finish seem to remain on the photos of the reworking of the reworked knobs.
Possibly . . . you just spritzed a light stain coating over the flaws ?
Can you try one more time, using one WIERD procedure that I use ?
First, after looking at the colorization of those knobs , I would say that calls for a base coloring agent used . .in the form of a small tube of BURNT UMBER oil colors (NOT Acrylic).
Then the use of the ever so common mineral spirits, in the eee-conomy Star or Crown gallon container, and that brand variance being whether you went to the Homeless Despot or Lowes(T).
Put your match head /corn kernel ? sized blob of burnt umber out on your palette, and take the tube back and get your money back . . .Wrong color !
Pick out a problem area and get thru the lacquer overcoating to get down to the base wood where the finish was initially chipped / eroded down to.
Then I use a common round toothpick and break in half to have its full center width and then place in mouth and salivate until moistened and slightly softened and then rotate slowly and lightly chew on (frontal teeth) to separate its fibers for about 1/4 in inwards from the end. (Former center)
This is akin to 'lebenteenth world countries" ( they do be mo' pore' than "thud world countries"), in that manner, where they can make a disposable toothbrush from a wooden stick.(Of course, they can be reused, but boy, do they get STRONG !)
You then take the already damp wooden brush and soak in mineral spirits.
(Make mental note . . .do not put back into mouth, or else, experience one WIERD taste and one funny looking mouth.)
You take the palette area and have multiple drops of thinner on a second area and lightly touch the wooden brush to the burnt umber and start transferring a little to start making that clear puddle approaching a slightly lighter coloring than that needed on the knob, but transfer light test deposits to the knob as you are gradually confirming your approach to a proper blended match.
You should finally hit it and then work the "brush" around in vertical stabbing / mottling movements to blend.
Let it completely dry and lightly spritz with light lacquer overspray. Confirm if there is color shift after that dries, if so, U have to make adjustment on the "puddle" for its applied color depth on the second knob, by the 3rd knob it should be the right mix to go back and strip and rework the 1st knob, possibly the second if it also didn't quite have that final degree of perfect match.
Grille cloth . . . I once found a mans XXL shirt made in the Honduras that was just about the colorizaton of that grille cloth of yours, along with the proper porosity, such that I used it for ~6 grill cloths thru the years.
Priced at $1.96 at a thrift store, but on sale on WEDNESDAY for 1/2 price.
That top right corner light reflecton is confirming a perfectly uniform matte finish sheen on the frontal cabinet panel !
. . . .73's de Edd

Los Knobbos:  |
:
:
:
:
:
:
:Sirs . . . .
:
:
:
:
:
:
:Ohhhh . . . . . this is very distressing and disturbing to me, as I am just looking at some of my custom instrumentaton and test equipmemt that I built back in '68 thru the 70's.
:
:
:When I clean off a micro layer of dust . . . .Woe is me . . . . I am not seeing any, checking, alligatoring, or flaking off, being as pristine as the day that I put it on.
:
:
:
:The product . . . .Krylon Crystal Clear . . .Acrylic Lacquer . .or is that lakker or lacqure ?
:
:
:
:Lets see now 10, 20, 30 , 40 + 1, that would be 41 years.
:
:
:
:Plus after also having confirmed you having heated the chassis during cleanup, that was the other aspect in humid times, to apply the Lacquer to that cooled down / degreased /pasteurized / homogenized / sterilized chassis in its only so slightly warm state.
:
:
:
:
:
:
:Baaaaaack to the KNOBS, Sir Peter, still the little boo-boos of scraped off finish seem to remain on the photos of the reworking of the reworked knobs.
:
:
:
:Possibly . . . you just spritzed a light stain coating over the flaws ?
:
:
:
:Can you try one more time, using one WIERD procedure that I use ?
:
:
:
:First, after looking at the colorization of those knobs , I would say that calls for a base coloring agent used . .in the form of a small tube of BURNT UMBER oil colors (NOT Acrylic).
:
:
:
:Then the use of the ever so common mineral spirits, in the eee-conomy Star or Crown gallon container, and that brand variance being whether you went to the Homeless Despot or Lowes(T).
:
:
:
:Put your match head /corn kernel ? sized blob of burnt umber out on your palette, and take the tube back and get your money back . . .Wrong color !
:
:
:
:Pick out a problem area and get thru the lacquer overcoating to get down to the base wood where the finish was initially chipped / eroded down to.
:
:Then I use a common round toothpick and break in half to have its full center width and then place in mouth and salivate until moistened and slightly softened and then rotate slowly and lightly chew on (frontal teeth) to separate its fibers for about 1/4 in inwards from the end. (Former center)
:
:
:
:This is akin to 'lebenteenth world countries" ( they do be mo' pore' than "thud world countries"), in that manner, where they can make a disposable toothbrush from a wooden stick.(Of course, they can be reused, but boy, do they get STRONG !)
:
:
:
:You then take the already damp wooden brush and soak in mineral spirits.
:
:
:
:(Make mental note . . .do not put back into mouth, or else, experience one WIERD taste and one funny looking mouth.)
:
:
:
:You take the palette area and have multiple drops of thinner on a second area and lightly touch the wooden brush to the burnt umber and start transferring a little to start making that clear puddle approaching a slightly lighter coloring than that needed on the knob, but transfer light test deposits to the knob as you are gradually confirming your approach to a proper blended match.
:
:
:
:You should finally hit it and then work the "brush" around in vertical stabbing / mottling movements to blend.
:
:
:
:Let it completely dry and lightly spritz with light lacquer overspray. Confirm if there is color shift after that dries, if so, U have to make adjustment on the "puddle" for its applied color depth on the second knob, by the 3rd knob it should be the right mix to go back and strip and rework the 1st knob, possibly the second if it also didn't quite have that final degree of perfect match.
:
:
:
:
:Grille cloth . . . I once found a mans XXL shirt made in the Honduras that was just about the colorizaton of that grille cloth of yours, along with the proper porosity, such that I used it for ~6 grill cloths thru the years.
:
:
:
:Priced at $1.96 at a thrift store, but on sale on WEDNESDAY for 1/2 price.
:
:
:
:That top right corner light reflecton is confirming a perfectly uniform matte finish sheen on the frontal cabinet panel !
:
:
:
:
:
:
:. . . .73's de Edd
:
:
:
:
:
:
:
:
:
:Los Knobbos: : : : : : : : : : |
:
:
:
:
:
:
As far as Krylon Crystal Clear goes, I've used it for years protecting art work, like pastel chalk and/or charcoal renderings. I've always believed it be an "plastic" coating rather than a traditional lacquer compound. I may be wrong but that may be why it's called: Acrylic Lacquer.
Very funy stuff! lol
As far as the knobs go you're probably just seeing some kind of light reflections... here's a much closer shot.
Just a matter of time before lacqure crack, chips and starts pealing
:
:::How effective do you find the clear lacquer to be in preventing further rusting of the chassis?
:::
:::I have been afraid to use it fearing that it may not be a long term solution.
:::
:::Thanks.
::::Ed.
::
::Hi Ed:
::I haven't been able to determine it as I only started doing it a few years ago. I know that with NOTHING it started rusting right away after cleaning away old rust.. so I had little to loose.
::
::But I got the idea from the fact that all brass furniture is lacquered to keep it from tarnishing.
::
::If you want REAL security try Permalac... they say it works in any weather too... needs refreshing coats about every ten years.
::http://www.permalac.com/
::
::
::
: