1.) I scanned the original glass into Photoshop.
2.) I cleaned it up and recreated all the numbers from a reasonably good looking font I had on hand and closely matched the colors.
3.) I mirrored the image (wrong-reading) for printing on a clear decal to be applied to the rear of the new glass
4.) I printed it out on my Cannon inkjet color printer onto the clear decal material and selected High Quality Gloss Film as the output material.
However... the colored inks are very translucent and as such they are quite thin... especially if any rear light is involved.
This color dark brown was very very thin looking so I reprinted another one using black and making the numerals a dark yellow.
5.) The black decal was still quite thin but that was the darkest I could get.
6.) I sprayed over the ink side of the decal with clear lacquer to seal the ink.
7.) I had a new glass cut the same size as the old.
8.) I applied the decal. It wasn't as dark as I wanted but it seemed reasonable since there isn't going to be any strong dial lamp light behind it and the dial pointer travels behind the glass and then there is another gold metal back-plate behind the pointer too.
9.) As I studied the numbers held in place by the dial area I felt I'd really like to see the numerals more gold-like and the black darker.
10.) I painted all of the dark areas of the decal with gold-leaf paint which allowed the numerals to look more gold-like and the black became more opaque.
When I get everything back in place on the radio I'll update this post.
Here's the various step pictures: 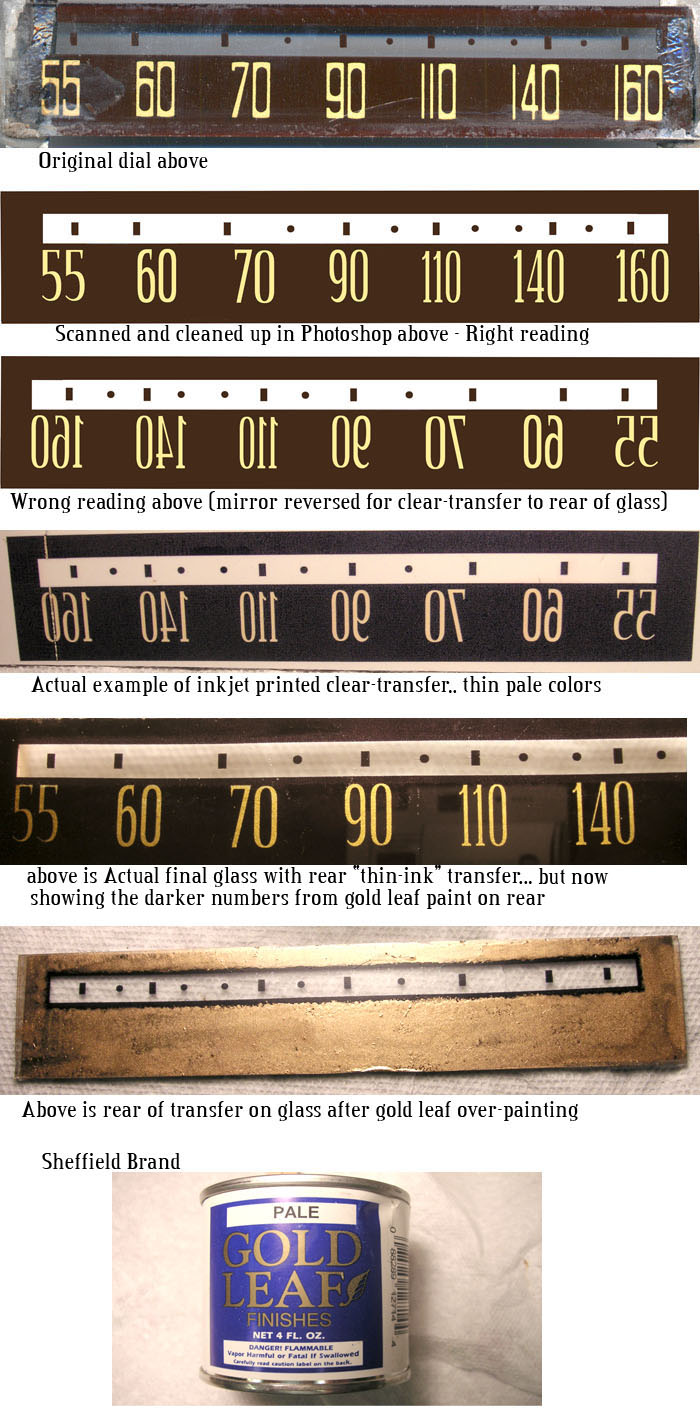
:
::
Hi Peter; Just a great looking decal !! Because you went into such detail as to how you reproduced it, I think some of us may try this method ourselves. Thank you for the info.
Andy
::
thanks for the pics peter i tried something similar once for an rca dial but mine didn't come out anywhere near that good.now that i have seen this i have new hope i will try again soon using your method it sure looks great.butch
I've had equally good results with gold acrylics, even on the front of decals, which is more difficult to fill in the black outline letters over yellow ink. I've successfully used the "plain paper" mode on my hp printer for some decals, since plain paper soaks up more ink, think the flow is greater. Most vendors recommend a clear acrylic (water based) lacquer to seal the decal before the water soak, but I'm reluctant to use water based lacquer over water based ink, so typically use clear nitro lacquer. I've also found that the inkjet decal sheets have a much thicker clear substrate than the preprinted products from Radio Daze. This doesn't affect the appearance placed on the rear of a dial glass, but is very obvious on a restored fine wood cabinet. The clear area of the preprinted products disappeared after placement and overcoating with clear nitro lacquer, but the same process with the inkjet product left an obvious raised edge at the demarcation. The product I used was bel decal, and just this week emailed a question about the thickness of the substrate, but as of today, no response. Guess I'll have to try a different brand next order.
marv
:I recreated the dial scale on my Emerson 702B because the previous one was really buggered up.
:
:1.) I scanned the original glass into Photoshop.
:
:2.) I cleaned it up and recreated all the numbers from a reasonably good looking font I had on hand and closely matched the colors.
:
:3.) I mirrored the image (wrong-reading) for printing on a clear decal to be applied to the rear of the new glass
:
:4.) I printed it out on my Cannon inkjet color printer onto the clear decal material and selected High Quality Gloss Film as the output material.
:However... the colored inks are very translucent and as such they are quite thin... especially if any rear light is involved.
:This color dark brown was very very thin looking so I reprinted another one using black and making the numerals a dark yellow.
:
:5.) The black decal was still quite thin but that was the darkest I could get.
:
:6.) I sprayed over the ink side of the decal with clear lacquer to seal the ink.
:
:7.) I had a new glass cut the same size as the old.
:
:8.) I applied the decal. It wasn't as dark as I wanted but it seemed reasonable since there isn't going to be any strong dial lamp light behind it and the dial pointer travels behind the glass and then there is another gold metal back-plate behind the pointer too.
:
:9.) As I studied the numbers held in place by the dial area I felt I'd really like to see the numerals more gold-like and the black darker.
:
:10.) I painted all of the dark areas of the decal with gold-leaf paint which allowed the numerals to look more gold-like and the black became more opaque.
:
:When I get everything back in place on the radio I'll update this post.
:
:Here's the various step pictures:
:
Hi Marve:
That has been my exact experience as well.
Hi Marv:
That has been my exact experience as well.
Steve
:Steve
Hi Steve:
I'm using an older couple of versions ago "version-CS"... I also now own "CS-3" too but it required more memory ...and also , by default, it installed some additional non-photoshop-specific windows type "acquire scanning" utilities that I don't necessarily need. ( causing me to wonder what happened to the standard windosw tool and a headache to undo and restore back to the normal windows utility.
Plus it's slower and more cumbersome... so maybe I'll play with it again another time but for now I'll stick with CS or earlier versions.
Tools:
I often use the clone tool, yes... but sometimes it's easier to make the Photoshop background color the same color as the dial color... that way you can just use the "eraser" over defects and it will allow the background color in that area. Or sometimes you can just select a large defined area with the magic wand tool or sometimes I just block out large areas and select "delete".. then again the background comes in to replace the old dial color. So in this case I did that for the entire non gold number/letter area.
There are many many tools and I'm sure someone can show me how to do it better too... but I always end up only using the tools I'm real familiar with.. and that may not always be the easiest way...y'know?
BTW... there's a new free-ware graphic program that I heard got good reviews called "Dogwaffle" !!???
Check it out:
... it's free... the pro-version is a cost though I think.
http://en.wikipedia.org/wiki/Project_Dogwaffle
I think decals area available everywhere in stores too but I bought mine online at www.kustomrides.com
Steve
I've had equally good results with gold acrylics, even on the front of decals, which is more difficult to fill in the black outline letters over yellow ink. I've successfully used the "plain paper" mode on my hp printer for some decals, since plain paper soaks up more ink, think the flow is greater. Most vendors recommend a clear acrylic (water based) lacquer to seal the decal before the water soak, but I'm reluctant to use water based lacquer over water based ink, so typically use clear nitro lacquer. I've also found that the inkjet decal sheets have a much thicker clear substrate than the preprinted products from Radio Daze. This doesn't affect the appearance placed on the rear of a dial glass, but is very obvious on a restored fine wood cabinet. The clear area of the preprinted products disappeared after placement and overcoating with clear nitro lacquer, but the same process with the inkjet product left an obvious raised edge at the demarcation. The product I used was bel decal, and just this week emailed a question about the thickness of the substrate, but as of today, no response. Guess I'll have to try a different brand next order.
marv
:I recreated the dial scale on my Emerson 702B because the previous one was really buggered up.
:
:1.) I scanned the original glass into Photoshop.
:
:2.) I cleaned it up and recreated all the numbers from a reasonably good looking font I had on hand and closely matched the colors.
:
:3.) I mirrored the image (wrong-reading) for printing on a clear decal to be applied to the rear of the new glass
:
:4.) I printed it out on my Cannon inkjet color printer onto the clear decal material and selected High Quality Gloss Film as the output material.
:However... the colored inks are very translucent and as such they are quite thin... especially if any rear light is involved.
:This color dark brown was very very thin looking so I reprinted another one using black and making the numerals a dark yellow.
:
:5.) The black decal was still quite thin but that was the darkest I could get.
:
:6.) I sprayed over the ink side of the decal with clear lacquer to seal the ink.
:
:7.) I had a new glass cut the same size as the old.
:
:8.) I applied the decal. It wasn't as dark as I wanted but it seemed reasonable since there isn't going to be any strong dial lamp light behind it and the dial pointer travels behind the glass and then there is another gold metal back-plate behind the pointer too.
:
:9.) As I studied the numbers held in place by the dial area I felt I'd really like to see the numerals more gold-like and the black darker.
:
:10.) I painted all of the dark areas of the decal with gold-leaf paint which allowed the numerals to look more gold-like and the black became more opaque.
:
:When I get everything back in place on the radio I'll update this post.
:
:Here's the various step pictures:
:
marv
:Peter,
:I've had equally good results with gold acrylics, even on the front of decals, which is more difficult to fill in the black outline letters over yellow ink. I've successfully used the "plain paper" mode on my hp printer for some decals, since plain paper soaks up more ink, think the flow is greater. Most vendors recommend a clear acrylic (water based) lacquer to seal the decal before the water soak, but I'm reluctant to use water based lacquer over water based ink, so typically use clear nitro lacquer. I've also found that the inkjet decal sheets have a much thicker clear substrate than the preprinted products from Radio Daze. This doesn't affect the appearance placed on the rear of a dial glass, but is very obvious on a restored fine wood cabinet. The clear area of the preprinted products disappeared after placement and overcoating with clear nitro lacquer, but the same process with the inkjet product left an obvious raised edge at the demarcation. The product I used was bel decal, and just this week emailed a question about the thickness of the substrate, but as of today, no response. Guess I'll have to try a different brand next order.
:
:marv
:
::I recreated the dial scale on my Emerson 702B because the previous one was really buggered up.
::
::1.) I scanned the original glass into Photoshop.
::
::2.) I cleaned it up and recreated all the numbers from a reasonably good looking font I had on hand and closely matched the colors.
::
::3.) I mirrored the image (wrong-reading) for printing on a clear decal to be applied to the rear of the new glass
::
::4.) I printed it out on my Cannon inkjet color printer onto the clear decal material and selected High Quality Gloss Film as the output material.
::However... the colored inks are very translucent and as such they are quite thin... especially if any rear light is involved.
::This color dark brown was very very thin looking so I reprinted another one using black and making the numerals a dark yellow.
::
::5.) The black decal was still quite thin but that was the darkest I could get.
::
::6.) I sprayed over the ink side of the decal with clear lacquer to seal the ink.
::
::7.) I had a new glass cut the same size as the old.
::
::8.) I applied the decal. It wasn't as dark as I wanted but it seemed reasonable since there isn't going to be any strong dial lamp light behind it and the dial pointer travels behind the glass and then there is another gold metal back-plate behind the pointer too.
::
::9.) As I studied the numbers held in place by the dial area I felt I'd really like to see the numerals more gold-like and the black darker.
::
::10.) I painted all of the dark areas of the decal with gold-leaf paint which allowed the numerals to look more gold-like and the black became more opaque.
::
::When I get everything back in place on the radio I'll update this post.
::
::Here's the various step pictures:
::
David
:David
you need to follow basic HTML code structure.
You must start the line with a left pointing carrot symbol then IMG src="then insert the exact web address of the location where the image is hosted or stored ie http://www.websitename.com/photoname.jpg" remember to start and end that address string with a quote symbol.
Then end the line with a right pointing carrot symbol