The other night I made the new plastic dial cover from .020 polycarbonate using Masonite as a template and baking the thing in my kitchen oven.
http://members.aol.com/EB062559/DIALCOVERS.html
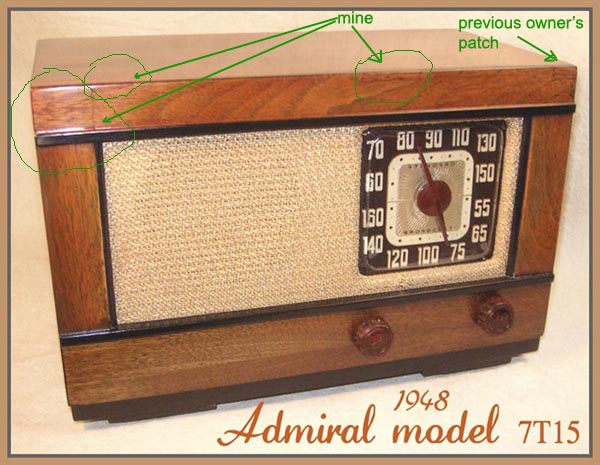
After bringing the somewhat rusted chassis back from the dead with Emory cloth and wire brushes ..then it was completely re-caped.
Even the original grill cloth was re-vitalized with a new thin layer of gold enamel spray paint and lacquer.
The tuner was also completely removed washed and replaced and grommets replaced too.
Then I performed my handy-dandy partial-re-cone trick on the speaker ...
http://www.pbpix.com/speakerfixed.jpg
All the veneer was patched as needed then sanded and stained with Minwax Special Walnut followed by at least 6 coats of Dutch Boy spray satin lacquer.. rubbed out with 0000 steel-wool between coats and a final touch of paste waxing applied with 0000 steel wool as well.
The non-original black trim was my idea. ( so sue me....lol)

![]()
I still have yet to make a replacement dial lens but I have everything I need to do so on hand. I think being able to make those new dial lenses is one of the most necessary techniques to learn in this hobby and I am determined to do so. (sooner or later - perhaps sooner.)
My current project has a very yellowed lens so it is a good candidate. I tried to bleach out the yellow but no luck. AlthoughI have had success with the bleaching method on several lenses in the past I was a bit surprised to see that the bleach / water mixture was attacking this particular lens and softening it up. Sooooooo...looks like I either live with a yellow lens or get down to it and make a new one.
Dennis
:
:I still have yet to make a replacement dial lens but I have everything I need to do so on hand. I think being able to make those new dial lenses is one of the most necessary techniques to learn in this hobby and I am determined to do so. (sooner or later - perhaps sooner.)
Dennis:
You might try Brasso on the salvageable lenses. Rub hard and it will pay off. Buff up for final shine with a soft cloth. Even if there's still a little amber or yellowish tinge when you are done... it makes it look a little more authentic.
I only make the new ones when I have too.
I bought a used scroll saw just to saw these Masonite forms and that works fine. Then I file ( I actually use a "surf-form tool" ) all edges to make the inner part loose inside the outer collar.
But between the sawing andthe oven baking... I don't look forward to it.
However the results are extremely rewarding.
:Here's a handsome little 1948 Admiral aa5 I've been fiddling with and just finished yesterday. I just love how this fine old radio sounds and looks now.
:
:The other night I made the new plastic dial cover from .020 polycarbonate using Masonite as a template and baking the thing in my kitchen oven.
:http://members.aol.com/EB062559/DIALCOVERS.html
:
:After bringing the somewhat rusted chassis back from the dead with Emory cloth and wire brushes ..then it was completely re-caped.
:Even the original grill cloth was re-vitalized with a new thin layer of gold enamel spray paint and lacquer.
:
:The tuner was also completely removed washed and replaced and grommets replaced too.
:
:Then I performed my handy-dandy partial-re-cone trick on the speaker ...
:http://www.pbpix.com/speakerfixed.jpg
:
:All the veneer was patched as needed then sanded and stained with Minwax Special Walnut followed by at least 6 coats of Dutch Boy spray satin lacquer.. rubbed out with 0000 steel-wool between coats and a final touch of paste waxing applied with 0000 steel wool as well.
:
:The non-original black trim was my idea. ( so sue me....lol)
:
:
:
:![]()

HEYYY.......Sir Peter:
I, for one, like your treatment of the two-toning of the cabinet, (along with the last one ) it somewhat enhancing what otherwise would be quite a Plain Jane and blasé piece of woodwork, with only the woodgrain highlighting accentuations being the sole attributes of the unit.
I guess the PBPix girlie pixs are enhancing your artistic express and its rolling on over into your radio works...LOL.
Would the problem areas be the yellow marked ones, as the rest of the cabinet was not shown ?
Also, the "gold" photographed as pale yellow and not a bright garish/ glittery gold...so much the better.
73's de Edd
:What is your technique to get the chassis so clean and bright? Is it all hand work?
:
:
::Here's a handsome little 1948 Admiral aa5 I've been fiddling with and just finished yesterday. I just love how this fine old radio sounds and looks now.
::
::The other night I made the new plastic dial cover from .020 polycarbonate using Masonite as a template and baking the thing in my kitchen oven.
::http://members.aol.com/EB062559/DIALCOVERS.html
::
::After bringing the somewhat rusted chassis back from the dead with Emory cloth and wire brushes ..then it was completely re-caped.
::Even the original grill cloth was re-vitalized with a new thin layer of gold enamel spray paint and lacquer.
::
::The tuner was also completely removed washed and replaced and grommets replaced too.
::
::Then I performed my handy-dandy partial-re-cone trick on the speaker ...
::http://www.pbpix.com/speakerfixed.jpg
::
::All the veneer was patched as needed then sanded and stained with Minwax Special Walnut followed by at least 6 coats of Dutch Boy spray satin lacquer.. rubbed out with 0000 steel-wool between coats and a final touch of paste waxing applied with 0000 steel wool as well.
::
::The non-original black trim was my idea. ( so sue me....lol)
::
::
::
::![]()
The other sides are fine but the areas I patched are here:
The chassis !! Is it steel wooled, painted, re-plated or Brasso'ed?? I'm in much need of your trade secret!!
marv
:Thans EDD:
:The other sides are fine but the areas I patched are here:
:
:![]()
:The chassis !! Is it steel wooled, painted, re-plated or Brasso'ed?? I'm in much need of your trade secret!!
:marv
Marv,
..it's all Emory cloth and wire brushes..
See my answer to Brian above.
::![]()
:
Yes Brian... sad to say there's no real easy way... it's all pure handwork.
I use Emory cloth and small steel-wire and brass-wire and hog's- hair brushes about the size of tooth brushes. ...usually in that order...
They are available in hardware stores and online cheap.
I really usually hate any kind of sanding at all... but to make it tolerable I tell myself... "hey ...it's only one square foot"... and then I feel much better...lol
![]()
T.