I have a Zenith Solid State Model AM FM Tuner, all i need is a off-on switch for the turntable.The Model of radio is C907-1 C908_1 & C910-1 where do i find one of these, need help would appreciate.
Randall
from the turntable? or by the end of play mechanisms activation, after having played the very last one of a stack of records? |
:Is the switch part of the turntable assembly? If so, do you know who made the turntable? Many of these early-1970s phonograph record changer units were manufactured by VM but there were other makers as well (Garrard comes to mind). If you can ID the changer manufacturer it should be fairly easy to find someone who specializes in their repair.
:
:
: : :  : : :Good morning Edd,thanks for the information you sent my way.The photos you sent with reply, the one that looks like the switch i have with my TT is the no 2# or 3# it is made of plastic. Mine broke apart,inside it has the lever with little spring and i dont know how to put it back togather.If i could get it back togather maybe the switch would work, i hope!!!!. A BIG THANK YOU : : : : : : : : : : : : : : |
:
:
:
:
::Is the switch part of the turntable assembly? If so, do you know who made the turntable? Many of these early-1970s phonograph record changer units were manufactured by VM but there were other makers as well (Garrard comes to mind). If you can ID the changer manufacturer it should be fairly easy to find someone who specializes in their repair.
::
:
:
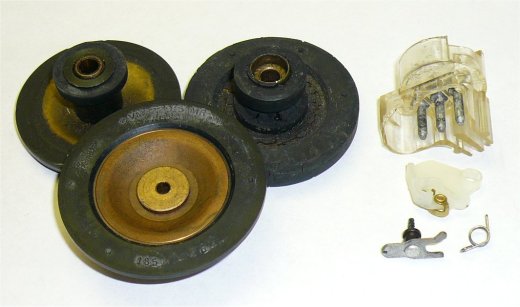
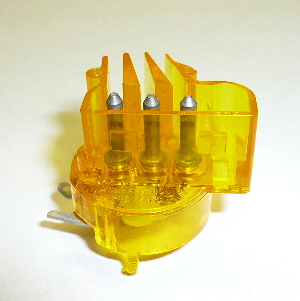
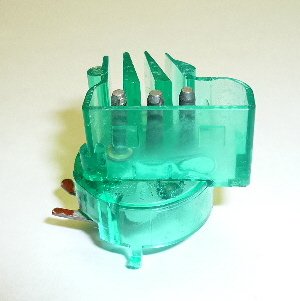
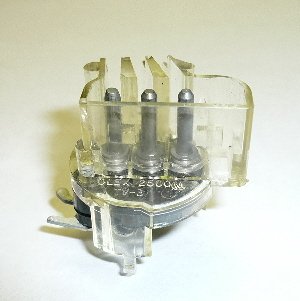
nor the mid generation of using an all metal housed cantilevered snap switch, but instead,the third generation of using a variant of the latter but with what looks to be a totally styrene plastic housed unit. supplied illustrations. action" where the switch would hang at either on or off position . . .usually off . . . since that was where it usually stayed.. rounded head of the rivet that the forked switch lever is pivoting on, then that permits the whole forked switch lever to lift straight up, alomg with the switch contact plate, just below it.. on contacts and moving switch mechanics done the job. just telescope around the stud: presented, slightly larger diameter . . . . the use/twirling of a round Swiss pattern file accomplished that action.. The unit was then assembled and a spot of solder to the rivet head reflowed the internal solder and all was mechanically capped off again. Now in examining the switch and turntable illustrations below: switch fall down and come apart ? reassemble the unit. Taking the unit in hand and examining the top portion, you can see that the middle portion . . . .what I call the "Contact swisher plate" . . . . . is needing to be placed inside of the top housing and pivoted a bit by hand to see that single contact is swinging between the other paired contacts. Once you see the amount of movement, then take note of the forked switch lever pawl at the bottom left in the pic and its counterpoise pivot spring over to the right. . . .we'll just ignore that tricky spring for a bit . able to manually manipulate and see the possible actual switch contact action at its two extreme limits and THAT switch contacting action WOULD be made. Lets move on. forked end protrudes outwardly from the external switch housing. That leaves the micro hole in the other side of the lever to be receiving the pesky pivot spring. plate and its much smaller diameter end drops into a hole in the outer housings plastic. Now, since all is well supported / levered, a moving finger tip on the lever end should really confirm a contact inter switching action. BUT exhibiting no SNAP action, without that additional counterpoise tension spring being installed. 60 years past, do fully expect one end to have a 90 degree bend on it and the other end to have a like 90 degree bend that will be allowing for the thickness of lever metal and then the bend makes another 90 degree bend outwardly (or possibly inwardly ). without it shifting and coming out of the levers hole, just by virtue of having had that transitional dual bend. permit the "threading" of that spring end thru the levers small hole and then you can reinstall the "swish plate" like it was just before on the mechanical pivoting test. That only leaves the ding-a-ling springs dangling end to be installed now into a hole in the swisher plate over to the side across from its pivoting fulcrum point. It requires that it be slightly tensioned to pull inwardly in order to drop down into its hole . After it is installed keep a thumb above and slightly against that area to keep anything from popping up and out. Then . . . .AND THEN . . . move the lever pawl with your other hand and see that there is one slightly off center point where the outward tensioning of the mechanical center of gravity of that spring tensioned movement makes transition and rapidly drives that plate over to its opposite position. There it will remain until the levers end is moved in the opposite direction , where the plate will shift and snap to its opposite direction. switch could possibly be restored, pending no broken plastic, tabs, etc. newer style, which is what you need, for 15 BUX. And I did not seem to find it to be an additional $49 for handling and shipping type of site.(Like some E-bay sites) unit . . .usually as 3 or 4 digits. to units is a springing apart or breaking of some plastic portion. Your previous exploration should reveal that aspect and possibly with you still coming out for "FREES" anyhow. than any epoxy/or/methyl methacrylate/or/ether/or/MEK /or/Cyanoacrylate could do. http://www.thevoiceofmusic.com/default.asp |


::
::
::
::
::
::
::
::Good morning Edd,thanks for the information you sent my way.The photos you sent with reply, the one that looks like the switch i have with my TT is the no 2# or 3# it is made of plastic. Mine broke apart,inside it has the lever with little spring and i dont know how to put it back togather.If i could get it back togather maybe the switch would work, i hope!!!!.
:
: A BIG THANK YOU
::
::Sir Randall . . . . . . . . . .
::
::
::Mo' info puh-leez.
::
::
::Is that switch related to switching AC power to the sets T/T from some other part of the solidified states radio and is being located apart
::
:: from the turntable?
::
::
::OR is it the one that we typically see mounted to the bottom of the turntable and is activated either by a link rod to the TT's on off reject lever
::
::or by the end of play mechanisms activation, after having played the very last one of a stack of records?
::
::
::Some few earlier ones were slide switches, but most were SNAP action switches . . . . . .thats a probably a looka-lika one 'a dese :
::
::
::
::
::
::
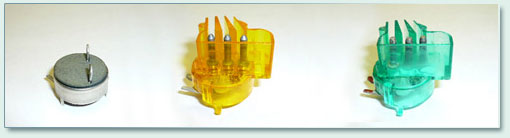
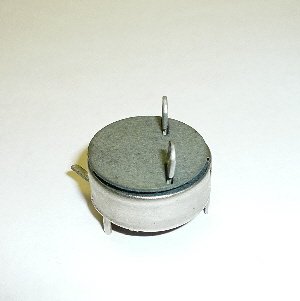
::OR . . . evan mo' biggas' . . . .
::
::
::
::
::
::
::
::
::
::
::
::
::
::
::
::
::
::
::If its being the latter type of switching action, BY ALL MEANS try a constant degreaser flooding and make with a clik-a clika . . .'bouts wuns to twos hunna' times and see if it wont clean up its contacts.
::
::
::Or I have even torn them down to clean and burnish the contacts and their counterpoised spring driven "swiper" arm.
::
::
::If that'sa no worka . . . and its all being for ab-soh-lute-ly FREES ! . . . . . I'm just a gonna tells you wheres to gets ones . . . . . if its being lika any one of the dee-pictions aboves.
::
::
::
::
::
::
::73's de Edd
::
::
::
::
::
::
::
::
::
::All probabilities are really being 50/50 % . . . . . . . . . either a thing WILL happen or it WON'T.
::
::
::
::
::
::
::
::
::
::
::
::
::
::
::
::
::
::
:::Is the switch part of the turntable assembly? If so, do you know who made the turntable? Many of these early-1970s phonograph record changer units were manufactured by VM but there were other makers as well (Garrard comes to mind). If you can ID the changer manufacturer it should be fairly easy to find someone who specializes in their repair.
:::
::
::
:
:
:
: : : : : :Good morning Sir Edd, you have done did it again a super job on helping me out with Zenith Turn Table On-Off switch.You did a super fine job on explaining with photos on how to repair the on-off switch.To make story on my end short i found the web page you inform me that does make repair on the broken one we have. That is the thing i have done, i sent mine to Voice Of Music for repaires, to get my T-T back on line and working. Again Sir Edd i thank you for the help and information you sent my way. Randall : : : : : : : : : : : : : : |
:
:
:
:
:
:
:
:
:::
:::
::: ::: ::: ::: ::: :::Good morning Edd,thanks for the information you sent my way.The photos you sent with reply, the one that looks like the switch i have with my TT is the no 2# or 3# it is made of plastic. Mine broke apart,inside it has the lever with little spring and i dont know how to put it back togather.If i could get it back togather maybe the switch would work, i hope!!!!. :: :: A BIG THANK YOU ::: :::Sir Randall . . . . . . . . . . ::: ::: :::Mo' info puh-leez. ::: ::: :::Is that switch related to switching AC power to the sets T/T from some other part of the solidified states radio and is being located apart ::: ::: from the turntable? ::: ::: :::OR is it the one that we typically see mounted to the bottom of the turntable and is activated either by a link rod to the TT's on off reject lever ::: :::or by the end of play mechanisms activation, after having played the very last one of a stack of records? ::: ::: :::Some few earlier ones were slide switches, but most were SNAP action switches . . . . . .thats a probably a looka-lika one 'a dese : ::: ::: ::: ::: ::: ::: :::OR . . . evan mo' biggas' . . . . ::: ::: ::: ::: ::: ::: ::: ::: ::: ::: ::: ::: ::: ::: ::: ::: ::: ::: :::If its being the latter type of switching action, BY ALL MEANS try a constant degreaser flooding and make with a clik-a clika . . .'bouts wuns to twos hunna' times and see if it wont clean up its contacts. ::: ::: :::Or I have even torn them down to clean and burnish the contacts and their counterpoised spring driven "swiper" arm. ::: ::: :::If that'sa no worka . . . and its all being for ab-soh-lute-ly FREES ! . . . . . I'm just a gonna tells you wheres to gets ones . . . . . if its being lika any one of the dee-pictions aboves. ::: ::: ::: ::: ::: ::: :::73's de Edd ::: ::: ::: ::: ::: ::: ::: ::: ::: :::All probabilities are really being 50/50 % . . . . . . . . . either a thing WILL happen or it WON'T. ::: ::: ::: ::: ::: ::: ::: ::: ::: ::: ::: ::: ::: ::: |
:::
:::
:::
:::
::::Is the switch part of the turntable assembly? If so, do you know who made the turntable? Many of these early-1970s phonograph record changer units were manufactured by VM but there were other makers as well (Garrard comes to mind). If you can ID the changer manufacturer it should be fairly easy to find someone who specializes in their repair.
::::
:::
:::
::
::
:
:
::
:: :: :: :: :: Hi too all who gave me help on my Zenith turn-table.i place an order for off-on switch for it. Received it and installed it and turn table is working super. Sir Edd in form me where to get switch, did so and the price was right. Thamks again to all for your help and information. Randall Hornback
:: :: :: :: :: :: :: :: :: :: :: :: :: :: |
::
::
::
::
::
::
::
::
::::
::::
:::: :::: :::: :::: :::: ::::Good morning Edd,thanks for the information you sent my way.The photos you sent with reply, the one that looks like the switch i have with my TT is the no 2# or 3# it is made of plastic. Mine broke apart,inside it has the lever with little spring and i dont know how to put it back togather.If i could get it back togather maybe the switch would work, i hope!!!!. ::: ::: A BIG THANK YOU :::: ::::Sir Randall . . . . . . . . . . :::: :::: ::::Mo' info puh-leez. :::: :::: ::::Is that switch related to switching AC power to the sets T/T from some other part of the solidified states radio and is being located apart :::: :::: from the turntable? :::: :::: ::::OR is it the one that we typically see mounted to the bottom of the turntable and is activated either by a link rod to the TT's on off reject lever :::: ::::or by the end of play mechanisms activation, after having played the very last one of a stack of records? :::: :::: ::::Some few earlier ones were slide switches, but most were SNAP action switches . . . . . .thats a probably a looka-lika one 'a dese : :::: :::: :::: :::: :::: :::: ::::OR . . . evan mo' biggas' . . . . :::: :::: :::: :::: :::: :::: :::: :::: :::: :::: :::: :::: :::: :::: :::: :::: :::: :::: ::::If its being the latter type of switching action, BY ALL MEANS try a constant degreaser flooding and make with a clik-a clika . . .'bouts wuns to twos hunna' times and see if it wont clean up its contacts. :::: :::: ::::Or I have even torn them down to clean and burnish the contacts and their counterpoised spring driven "swiper" arm. :::: :::: ::::If that'sa no worka . . . and its all being for ab-soh-lute-ly FREES ! . . . . . I'm just a gonna tells you wheres to gets ones . . . . . if its being lika any one of the dee-pictions aboves. :::: :::: :::: :::: :::: :::: ::::73's de Edd :::: :::: :::: :::: :::: :::: :::: :::: :::: ::::All probabilities are really being 50/50 % . . . . . . . . . either a thing WILL happen or it WON'T. :::: :::: :::: :::: :::: :::: :::: :::: :::: :::: :::: :::: :::: :::: |
::::
::::
::::
::::
:::::Is the switch part of the turntable assembly? If so, do you know who made the turntable? Many of these early-1970s phonograph record changer units were manufactured by VM but there were other makers as well (Garrard comes to mind). If you can ID the changer manufacturer it should be fairly easy to find someone who specializes in their repair.
:::::
::::
::::
:::
:::
::
::
:
: