| Larry Weide | 1/95 |
 |
Hi... all you CRCers! Well, if you had read last month's 'Box article on the restoration of antique speaker permanent magnets, you might have caught the comment I made about doing a subsequent article on the restoration of antique speaker paper cones. Some of the guys mentioned that they thought that Leamon Brooks, one of our very knowledgeable CRC members, had some information for making flat stock paper patterns that could then be formed into the desired sized speaker cones. To make a long story short, indeed, Leamon is a fund of knowledge on the subject. So, I want to give a lot of thanks and credit to Leamon Brooks not only for mailing me a copy of his speaker cone data table, but also for spending time with me to talk through some of the finer points of constructing replacement early speaker cones. During the 20's and even into the early 30's, most speakers didn't have much "hi" to their "fi". For all intensive purposes the first ones were merely a horn attached to an earphone. The next step was to remove the horn and metal acoustical diaphragm and replaced these parts with a paper cone attached to a mechanical linkage that was in turn operated by a coil/magnet assembly (see Nov/94 Flash 'Box article). This type of speaker was far better than the horn speaker, but pretty soon engineers developed the first models of the modern day speaker. That is, a speaker with a compliant cone that was integrally attached to a low mass voice coil that in turn was operated by it's close proximity to a strong stationary magnet. Many of the old paper cone speakers have survived and they sure do add authenticity to the display and operation of the radios that they were originally attached to. Unfortunately, time, dampness, pests and abuse have taken their toll on many a paper cone. But as you will see, replacing a cone is not all that tough, and it can be done very inexpensively. Although the cones of the various speakers came in many different sizes and colors, they had two characteristics that make them fairly easy to replicate with modern materials. First, most of them were constructed with a paper that had the constitution similar to medium grade tag board - which is easily found in most art supply stores. Second, they almost always had the shape of a regular cone - which lends itself to a simple construction technique. So, let's take a stab at reconstructing one of these speaker cones. The first thing to do is to determine your original cone's depth from the opening that faces the listener to the back where it comes to a point. Actually, the exact point is normally missing as this is the usual place where the mechanical linking rod is connected. Next, you need to determine the width of the cone's opening. In cases where the cone is missing or beyond useful measuring, you would use the speaker shell/container and linkage connecting points to anticipate the cone's dimensions. Don't forget, tag board is cheap, and you can afford to make a mistake or two when arriving at your final accurate measurements. You may also want to "play" with other even cheaper papers until you get the dimensions just right. The next step is to calculate and mark cutout guidelines on the tag board paper, using the depth and width measurements that you just made. There are two calculations to make. First is the diameter of the circular pattern, and second is a circle chord line that will indicate what size "pie" shaped section to cut out of the pattern to correctly form it into a cone shape. At this point you can go a couple of ways; * You can use the formulas below that I worked out. * Or, you can use the simple PC BASIC program below that I wrote. 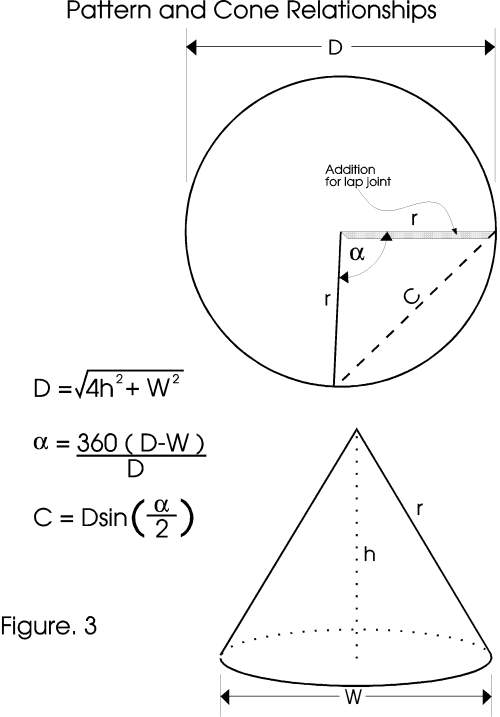 To find the pattern diameter and chord by formula follow these steps;
Radians = Degrees X pi / 180 (pi=3.141) To find the pattern diameter and chord by a simple PC BASIC program;
10 INPUT "Enter required cone depth ",H
OK, we're now ready to make our tag board pattern.
Hey, that's basically it. For those cones that are visible and have colors other than the "raw" paper, you can lightly tint them with a non-water based paint. Flat spray colors will be the easiest to apply, but you'll have to decide for yourself what replicates the original cone the best. |
|